














DIY Guide: Replacing Spark Plugs at Home


To replace your spark plugs at home, start by parking on a flat surface and letting the engine cool completely. Gather essential tools: a spark plug socket, ratchet, torque wrench, gap gauge, and dielectric grease. Carefully remove ignition coils or boots, then use the socket to extract old plugs one at a time. Inspect and gap new plugs per specs, apply anti-seize, and install hand-tight before torquing precisely. Reattach components securely and check engine performance. Follow these steps to master the full replacement process efficiently.
Table
- Main Points
- Importance of Spark Plug Replacement
- Tools and Materials Needed
- Preparing Your Vehicle for Spark Plug Replacement
- Locating and Accessing Spark Plugs
- Removing Old Spark Plugs Safely
- Inspecting and Gapping New Spark Plugs
- Installing New Spark Plugs Correctly
- Reconnecting Ignition Components
- Testing Engine Performance After Replacement
- Frequently Asked Questions
- Final Thoughts
Main Points
- Park on a flat surface, let the engine cool, and disconnect the battery before starting spark plug replacement.
- Use a spark plug socket and 3/8 ratchet wrench to carefully remove spark plugs one at a time.
- Inspect old plugs for wear or corrosion to diagnose engine issues before installing new ones.
- Check and adjust the spark plug gap, apply anti-seize to threads, and hand-tighten plugs before torquing.
- Reattach ignition coils securely, apply dielectric grease to boots, and test engine performance for smooth operation.
Importance of Spark Plug Replacement

Spark plug replacement plays a critical role in maintaining your engine’s efficiency and performance. You must replace spark plugs every 20,000 to 40,000 miles to prevent engine misfires, rough idling, and reduced fuel efficiency. These components ignite the air-fuel mixture, directly influencing combustion quality and engine output. Ignoring their condition risks costly engine damage and compromised reliability. To guarantee peak engine performance, consult your vehicle’s owner’s manual for the precise spark plug type and gap specifications. Following these guidelines guarantees you maintain control over your engine’s health, empowering you to avoid unnecessary repairs and preserve smooth operation. By adhering to proper spark plug maintenance, you liberate yourself from avoidable mechanical issues and keep your vehicle running at peak capacity.
Tools and Materials Needed

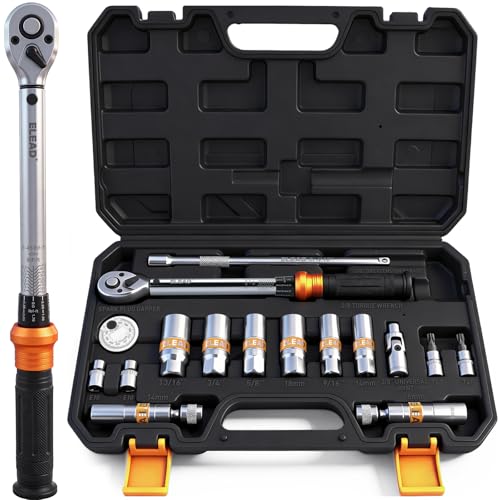
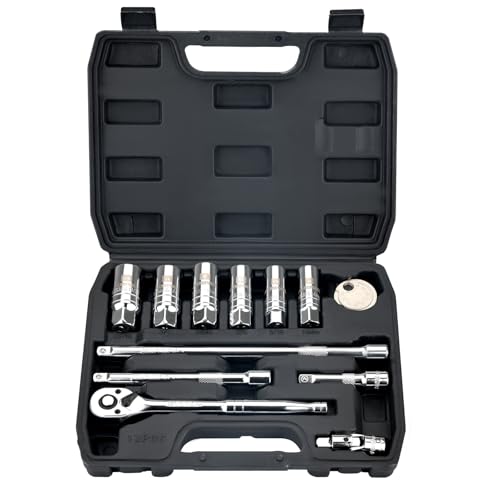
You'll need specific tools like a spark plug socket and a torque wrench to remove and install spark plugs correctly. Essential materials include anti-seize compound and dielectric grease to protect components and guarantee proper function. Additionally, a gap gauge helps you verify and adjust the spark plug gap to manufacturer specifications before installation.
Essential Tools Overview
Before you begin replacing plugs, gather the essential tools to guarantee safety and efficiency. Having the right equipment affirms you remove and install spark plugs without damage or error.
Key tools include:
- Spark plug socket: specially designed for secure grip and quick removal.
- 3/8 ratchet wrench: applies controlled torque to loosen old plugs safely.
- Torque wrench: critical for tightening new spark plugs to exact manufacturer specs, preventing over-tightening.
- Dielectric grease: lubricates spark plug boots, affirming proper sealing and moisture protection.
With these tools, you maintain control over each step, liberating yourself from costly mechanic visits. Accurate torque application protects your engine, while the correct socket avoids stripping. Equip yourself properly and proceed with confidence. For best results, consider using a 1/2-inch drive dual-direction adjustable click torque wrench to ensure precise tightening and prevent over-tightening during installation.
Required Replacement Materials
To replace your vehicle's plugs effectively, gather at least four critical materials: new plugs that match your engine's specifications, a torque wrench for precise tightening, a spark plug socket designed for secure handling, and optionally, dielectric grease to protect connections from moisture. For successful spark plug replacement, verify your new plugs align with the manufacturer’s specs, which you can confirm via the owner’s manual or auto parts specialists. Use the spark plug socket to safely remove and install plugs without damaging them. The torque wrench guarantees you tighten plugs to exact torque settings, avoiding engine damage. Applying dielectric grease to the boot connections prevents moisture intrusion, enhancing longevity. Consider anti-seize compound on plug threads to ease future removals, securing your work’s durability and your mechanical independence.
Preparing Your Vehicle for Spark Plug Replacement

Although it may seem straightforward, preparing your vehicle properly is crucial for a safe and efficient spark plug replacement. This step guarantees you can check the spark without risk and uphold essential car maintenance standards. Begin by parking on a flat surface and letting the engine cool completely. Consult your owner’s manual for spark plug types and replacement intervals to confirm compatibility.
Next, methodically prepare your workspace and tools:
 Honda Civic Spark Plug Replacement: Top 10 Tips
- Disconnect the battery to prevent electrical hazards.
- Remove obstructive covers and clean the area to avoid debris contamination.
- Gather tools: spark plug socket, ratchet, torque wrench, gap gauge, and dielectric grease.
- Verify spark plug locations and confirm engine readiness.
Thorough preparation liberates you to perform a precise, damage-free replacement with confidence.
Locating and Accessing Spark Plugs

Start by consulting your vehicle’s manual to pinpoint the exact spark plug locations, usually on the cylinder head beneath engine covers. Remove any engine covers or ignition coil boots carefully to expose the spark plugs without damaging connectors. Keep the area clean to prevent debris from entering the combustion chamber during removal.
Spark Plug Locations
Locating spark plugs involves identifying their positions on the engine cylinder head, which can vary depending on your vehicle’s engine design. You'll often need to remove ignition coils or other obstructing parts to access them fully. Consulting your owner's manual is vital to pinpoint the exact number and layout of spark plugs, especially since designs differ widely.
- Spark plugs sit directly on the cylinder head, arranged per engine type (inline, V6, V8).
- Ignition coils typically cover each spark plug, requiring careful detachment.
- Use a flashlight to navigate tight or dark engine compartments.
- Work on one spark plug at a time to avoid wire confusion and guarantee accurate reinstallation.
Mastering spark plug locations liberates you to perform precise maintenance confidently.
Engine Cover Removal
Before removing the engine cover, consult your vehicle’s owner’s manual to identify the exact location of the cover and the spark plug access points specific to your model. Open the engine compartment and locate the cover. Unscrew bolts or clips carefully, ensuring you keep track of all fasteners for a smooth reassembly. Clean around the cover using compressed air to prevent debris from entering. Detach any ignition coils blocking access, noting their order. Once removed, you can access the spark plugs directly to remove the old spark components.
| Step | Action |
|---|---|
| 1 | Consult owner’s manual |
| 2 | Open engine compartment |
| 3 | Unscrew and remove engine cover |
| 4 | Clean spark plug area |
| 5 | Detach ignition coils, access spark plugs |
Accessing Spark Plug Boots
With the engine cover and ignition coils removed, you can now focus on accessing the spark plug boots. Locating them requires following the spark plug wire or coil leads directly to the boots. Take care when disconnecting to avoid damaging connectors. Use proper tools if access is tight.
- Confirm the engine is cool before handling any components.
- Trace the ignition coil or spark plug wire to find each boot.
- Gently twist and pull the boot straight off, avoiding force.
- Use a socket extension to reach difficult spark plugs.
Mastering accessing spark plug boots empowers you to replace your spark plugs confidently and efficiently, liberating yourself from costly mechanic visits.
Removing Old Spark Plugs Safely

Although it’s tempting to start immediately, you must guarantee the engine is completely cool to avoid burns and prevent damage to sensitive components. To change spark plugs effectively, use a spark plug socket with a 3/8 ratchet, ensuring a secure grip to loosen each old plug carefully. Remove plugs one at a time, maintaining the firing order to avoid confusion on reinstallation.
| Step | Detail |
|---|---|
| Cool Engine | Prevent burns, protect components |
| Tool | Spark plug socket, 3/8 ratchet, adapter |
| Removal Method | One at a time, maintain firing order |
Inspect old plugs for corrosion or wear; this insight aids a professional mechanic in diagnosing engine issues before installing new plugs.
Inspecting and Gapping New Spark Plugs
After removing the old spark plugs carefully, turn your attention to the new ones. Inspect each plug thoroughly for any visible damage or defects that could compromise performance. Next, verify the spark plug gap using a precise gap gauge, ensuring it aligns with your vehicle's specifications. Adjust the gap as needed by gently bending the ground electrode or using a specialized gapping tool. Remember, accurate spark plug gap is critical for efficient combustion and ideal engine function. Before proceeding, confirm that your new plugs are compatible with your vehicle’s make and model to avoid fitment issues.
 5 Signs Your Car Has Faulty Spark Plugs
- Inspect plugs for cracks, chips, or manufacturing defects
- Measure spark plug gap with a calibrated gap gauge
- Adjust gap carefully to match manufacturer specs
- Apply anti-seize compound to threads to ease future plug replacement
Installing New Spark Plugs Correctly
Before installing new spark plugs, make certain the cylinder head has cooled completely to prevent damage and assure proper seating. Verify you have the correct spark plug type and have accurately gapped a spark according to your vehicle’s specifications. Start by hand-tightening each plug to avoid cross-threading. Once seated, use a torque wrench to tighten them precisely to the manufacturer’s recommended torque value; this guarantees ideal compression and prevents thread damage. Applying dielectric grease inside the spark plug wire boot before reattaching enhances electrical connection and guards against corrosion. By methodically following these steps, you maintain engine efficiency and reliability, freeing yourself from unnecessary service visits and costly repairs. Your careful attention to installing new spark plugs correctly empowers you with improved vehicle performance and lasting spark integrity.
Reconnecting Ignition Components
Reconnect the ignition coil or boot by carefully aligning it over the new spark plug and pressing down firmly until you hear it click into place. Properly reconnecting ignition components is critical for a stable ignition system and to prevent a check engine warning. Follow these steps to guarantee a secure connection:
- Attach the electrical connector firmly to the ignition coil for consistent power flow.
- Apply a small amount of dielectric grease inside the spark plug boot to ease future removal and block moisture.
- Reinstall any hold-down bolts to secure the coil, minimizing vibration risks.
- Double-check all connections before starting the engine to avoid misfires and guarantee optimal ignition performance.
This methodical approach ensures reliable reconnection and maintains your engine’s efficiency and freedom from faults.
Testing Engine Performance After Replacement
Once the ignition components are securely reattached, you can proceed to evaluate the engine’s response to the new spark plugs. Begin by turning the ignition to the "on" position and listen for a strong, blue spark, confirming proper electrical flow. During testing engine performance, monitor closely for warning signs such as misfires, rough idling, or unusual smells and smoke. These symptoms may indicate installation errors or wiring issues. Conduct a controlled test drive to assess acceleration and fuel efficiency, as improvements reflect successful replacement. If the engine struggles to turn over or exhibits persistent problems, promptly recheck wire connections. This methodical approach will guarantee smooth operation and prevent potential damage, empowering you to confidently maintain your vehicle’s performance after spark plug replacement.
Frequently Asked Questions
How to Change Your Spark Plugs by Yourself?
You’ll identify spark plug types, gather changing tools like a torque wrench and socket, then carefully swap plugs to restore engine performance. Follow specs precisely, ensuring proper gaps and torque, freeing yourself from costly mechanic visits.
Is It Safe to Change Spark Plugs by Yourself?
You can save over $100 by changing spark plugs yourself, but prioritize safety precautions like a cool engine. Personal experience shows common misconceptions cause errors; methodically following steps guarantees safe, effective maintenance without professional help.
What Should You Not Do When Changing Spark Plugs?
Don't commit common mistakes like over-tightening or mixing spark plug brands. Always use proper tools and respect your engine type specifications. Avoid forcing removal or working on a hot engine to prevent damage and guarantee safe replacement.
Should You Put Anything on Spark Plugs Before Installing?
Don’t make a mountain out of a molehill, but you can apply a tiny bit of anti-seize compound or thread lubricant on spark plug threads, and dielectric grease inside boots—only if your manufacturer approves—to guarantee easy removal and solid connections.
Final Thoughts
Replacing spark plugs might seem like a small task, but it’s the heartbeat of your engine’s performance. By following each step carefully—preparing your vehicle, removing old plugs, inspecting, and installing new ones—you guarantee smooth combustion and efficient power. Think of your engine as a finely tuned orchestra; every spark plug plays an essential note. When done methodically, you’re not just changing parts—you’re restoring harmony under your hood.
 Why Should Beginners Learn Spark Plug Replacement?
Reliable Floor Jacks on a Budget: Best Picks for Under $150
Top-Rated Floor Jacks Over $100: Built for Professionals, Priced for Smart Buyers
If you want to know other articles similar to DIY Guide: Replacing Spark Plugs at Home you can visit the Spark Plug Care and Replacement category.
What Tools Are Needed for Spark Plug Replacement?

Is It Safe to Drive With Bad Spark Plugs?

5 Best Ways to Spot Bad Spark Plugs

Toyota Camry Spark Plug Replacement Cost Guide

Why Should Beginners Learn Spark Plug Replacement?

5 Signs Your Car Has Faulty Spark Plugs

Honda Civic Spark Plug Replacement: Top 10 Tips

What Are the Best Spark Plugs for High Mileage Cars?
Leave a Reply
This is also interesting