


How to Rotate Your Car Tires Yourself


To rotate your car tires yourself, start by parking on a flat surface and engaging the parking brake.
Use a floor jack and jack stands to safely lift and secure the vehicle. Loosen lug nuts before lifting, then fully remove tires following the correct rotation pattern for your drivetrain.
Reinstall tires, hand-tighten lug nuts, lower the car, and torque them to spec. Check tire pressure and re-tighten after driving briefly.
Proper technique guarantees safety, tire longevity, and ideal handling—details on each step make the process straightforward.
Table
- Main Points
- Tools and Equipment Needed for Tire Rotation
- Preparing Your Vehicle for Tire Rotation
- Safely Lifting the Vehicle
- Removing the Tires
- Understanding Tire Rotation Patterns
- Rotating and Reinstalling the Tires
- Properly Tightening Lug Nuts
- Lowering the Vehicle and Final Checks
- Post-Rotation Maintenance and Safety Tips
- Frequently Asked Questions
- Final Thoughts
Main Points
- Park your car on a flat surface, engage the parking brake, and gather tools like a floor jack, lug wrench, and torque wrench.
- Loosen lug nuts on all wheels before lifting the vehicle using a quality floor jack and secure it with jack stands.
- Remove tires carefully, inspect for damage, check tire pressure, and note original positions for proper rotation pattern.
- Rotate tires according to your vehicle’s drivetrain pattern, hand-thread lug nuts, then lower the vehicle and torque nuts to specifications.
- After driving 100 miles, recheck and retighten lug nuts, and maintain regular rotations every 5,000 to 7,500 miles for optimal tire health.
Tools and Equipment Needed for Tire Rotation

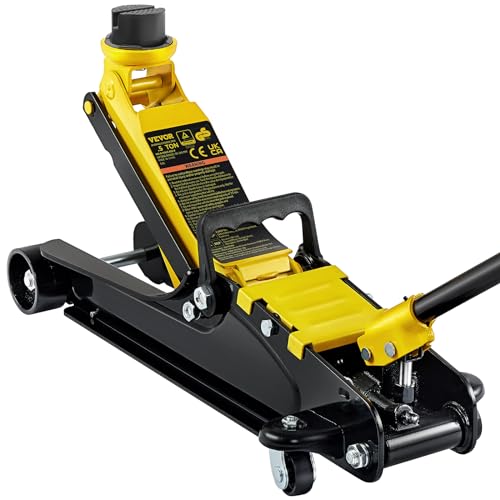
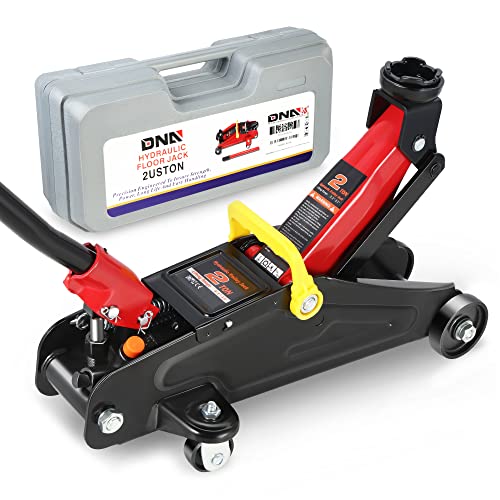
To rotate your car tires effectively, you'll need specific tools and equipment that guarantee safety and efficiency. Start with a quality floor jack rated for your vehicle's weight to lift it securely, paired with sturdy jack stands to hold the car in place. Use a lug wrench or breaker bar to loosen lug nuts—choose a breaker bar for stubborn nuts to avoid damage. After rotation, rely on a torque wrench to tighten lug nuts to manufacturer specifications, preventing over- or under-tightening. An impact wrench, especially when powered by a 21-gallon compressor, can speed lug nut removal and installation, but protect lug nuts with non-marring impact sockets. Ergonomic jacks reduce strain, and using two floor jacks can make the process faster, giving you control and efficiency in every step. For the best results, consider using a Grainger floor jack, as their robust construction and safety features provide reliable support during tire rotation.
Preparing Your Vehicle for Tire Rotation

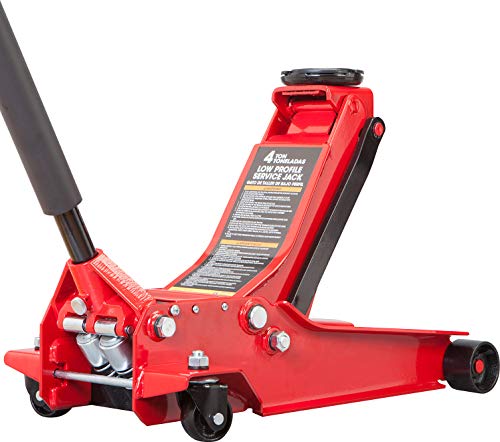
Start by parking your vehicle on a flat surface and engaging the parking brake to guarantee stability during rotation. Confirm you have all necessary tools ready, including a floor jack, jack stands, and a torque wrench. Before lifting the car, break the lug nuts loose to ease wheel removal once elevated. For best results and safety, consider using a low-profile floor jack, especially if your vehicle has low ground clearance.
Safety Precautions First
Before you begin rotating your car tires, take four essential safety steps to assure a secure working environment. Always engage the parking brake to prevent vehicle movement. Position your vehicle on a flat, stable surface. Use a heavy-duty floor jack and jack stands; avoid OEM scissor jacks due to reliability concerns. Confirm all tools are functional and understand your car’s factory jacking points to prevent frame damage. For best results and peace of mind, select a heavy-duty floor jack that offers both stability and longevity, as detailed in the top recommendations for 2023.
| Step | Action | Purpose |
|---|---|---|
| 1 | Engage parking brake | Prevent vehicle movement |
| 2 | Park on flat surface | Assure stability |
| 3 | Use heavy-duty jack & stands | Safely lift and support vehicle |
| 4 | Check tool condition | Assure tool reliability |
| 5 | Locate factory jacking points | Protect vehicle frame integrity |
Essential Tool Checklist
After securing the vehicle with the parking brake and positioning it on a flat surface, gather the necessary tools for the tire rotation. Using the right equipment guarantees safety and efficiency when lifting and working on your tires. Avoid relying on the OEM jack; opt for a sturdy 2-3 ton floor jack instead. Before lifting, use a breaker bar to loosen lug nuts for better leverage. Here’s your essential tool checklist:
- Floor jack (2-3 ton capacity) – for reliable lifting
- Jack stands – to securely support the vehicle
- Lug nut wrench or breaker bar – to loosen and tighten lug nuts
- Torque wrench – to accurately retighten lug nuts after rotation
Having these tools ready lets you perform tire rotation confidently and independently. For added peace of mind, choose a floor jack that meets ASME PASE safety standards to ensure both durability and user safety during your tire rotation.
Safely Lifting the Vehicle

To lift your vehicle safely, use a heavy-duty floor jack rated for at least 2-3 tons instead of relying on the OEM scissor jack, which may be less stable. Position the floor jack at the manufacturer’s recommended jacking points near the frame or suspension to guarantee stability. Once lifted, immediately use jack stands to support the vehicle securely under the frame or suspension. Never rely on the jack alone. Confirm the tires are slightly off the ground to allow easy access during rotation. Always work on a flat, stable surface to prevent slipping or tipping. By following these precise steps, you maintain control and safety, empowering yourself to rotate your tires confidently and independently. For enhanced efficiency and safety, consider using a hydraulic floor jack with dual piston pump for a faster and more reliable lifting experience.
 7 Tips to Save on Local Tire Rotation Costs
Removing the Tires

Loosen the lug nuts on all four wheels using a breaker bar while the vehicle is still on the ground to prevent the wheels from spinning. Once loosened, lift the vehicle securely with a floor jack and place jack stands for safety. Now, remove the tires carefully to promote even wear.
- Use an impact wrench to remove lug nuts quickly, but don’t forget to torque them to manufacturer specs during reinstallation.
- Keep lug nuts organized by their original wheel position to avoid confusion.
- Check tire pressure and inspect tires for damage before reinstalling.
- Remove each tire fully, allowing you to rotate and balance them properly.
Before lifting your car, make sure your floor jack has a sufficient lifting range to safely accommodate your vehicle’s ground clearance and weight.
Following these steps guarantees your tires wear evenly and your vehicle remains safe on the road.
Understanding Tire Rotation Patterns

When you rotate your tires, following the correct pattern based on your vehicle's drivetrain is crucial for even wear and best performance. For front-wheel drive vehicles, move the front tires straight back on the same side, while crossing the rear wheels to the opposite front positions. Rear-wheel drive requires keeping the rear wheels stationary and crossing the front tires to the rear. All-wheel drive demands more frequent tire rotations—every 3,000 to 5,000 miles—to balance wear across all tires. If you have directional tires, rotate them only laterally, never front to back, to maintain their tread integrity. Asymmetric tires must stay on the same side but can be rotated in any position. Adhering to these patterns guarantees uniform wear, extends tire life, and liberates you from premature replacements.
Rotating and Reinstalling the Tires
Although understanding the rotation pattern is essential, correctly reinstalling the tires is equally critical to confirm safety and performance. As you rotate your tires, follow these steps to guarantee proper reinstallation:
Proper tire reinstallation is just as vital as the rotation pattern to ensure safety and performance.
- Align each tire according to the recommended rotation pattern for your vehicle type.
- Hand-thread lug nuts to avoid cross-threading, keeping them organized to prevent mix-ups.
- Lower the vehicle carefully and check tire pressure, adjusting to manufacturer specifications.
- After driving about 100 miles, re-inspect lug nuts for tightness and verify tire pressure remains stable.
Taking a moment to assess the situation before reinstalling the tires can help you identify any underlying issues, such as uneven wear or potential structural concerns, ensuring your vehicle’s safety on the road.
Properly Tightening Lug Nuts
You need to tighten lug nuts to the manufacturer’s specified torque, usually between 80 and 125 ft/lbs, to guarantee proper security without damaging components. Always follow a crisscross pattern when tightening to distribute pressure evenly across the wheel. Start by hand-tightening each nut before using a torque wrench for the final adjustment. For best results, consider using a click torque wrench to ensure you achieve the correct torque setting and avoid over-tightening.
Correct Torque Specifications
Because proper torque guarantees both safety and performance, you must tighten lug nuts to the manufacturer’s specified range, typically between 80 to 125 ft/lbs. Accurate torque prevents wheel detachment and avoids damage to the wheels or hub.
Follow these steps for correct torque specifications:
- Hand-tighten each lug nut to seat them properly and avoid thread stripping.
- Use a calibrated torque wrench to apply the exact torque within your vehicle’s specified range.
- Consult your owner’s manual for the precise torque values tailored to your wheels.
- After driving about 100 miles, re-torque the lug nuts to verify they remain secure.
Mastering lug torque liberates you from unsafe wheel installations and maximizes your vehicle’s performance.
 What Tire Maintenance Checklist Should New Owners Follow?
Tightening Sequence Techniques
After setting the correct torque specifications, focus on the tightening sequence to confirm even pressure distribution across all lug nuts. Use a crisscross pattern when tightening to prevent brake rotor warping and ensure a secure fit. Start by hand-tightening lug nuts to seat them properly, then lower the vehicle before applying the final torque with a wrench. Always tighten lug nuts to the manufacturer’s specified torque, typically between 80 to 125 ft/lbs. If you used an impact wrench for loosening, finish with a torque wrench for accuracy. Recheck torque after about 100 miles to maintain safety. For best results, consider using a torque wrench with over 99% accuracy to ensure precise and reliable tightening.
| Step | Action |
|---|---|
| 1 | Hand-tighten nuts |
| 2 | Tighten in crisscross pattern |
| 3 | Apply final torque after lowering |
Lowering the Vehicle and Final Checks
Lower the vehicle carefully once the tires are swapped, keeping the lug nuts hand-tight to prevent any wheel movement during descent. After lowering the vehicle, follow these final checks to guarantee safety and performance:
Lower the vehicle carefully with lug nuts hand-tight to ensure wheel stability during descent.
- Use a torque wrench to tighten the lug nuts to the manufacturer's specified torque, typically 80-125 ft/lbs.
- If you used a spare tire during rotation, reinstall it properly before finalizing.
- Check and adjust tire pressure on all tires to manufacturer guidelines for maximum handling and safety.
- Plan to re-torque the lug nuts after driving about 100 miles to counteract any settling.
When performing these steps, always ensure you are using jack stands with a double locking pawl system for added stability and safety during your tire rotation.
Post-Rotation Maintenance and Safety Tips
When you finish rotating your tires, make certain to re-torque the lug nuts to the manufacturer's specified range, usually between 80 and 125 ft/lbs, to guarantee they remain securely fastened. This step is critical for post-rotation maintenance. Next, check and adjust tire pressures, as repositioning and temperature shifts can affect inflation. Remember that tires wear down at different rates, especially those on the rear axle, so regular inspections are essential to catch uneven wear or damage early. After driving about 100 miles, re-torque the lug nuts to compensate for settling. Keep a detailed maintenance log to track tire health and maintain a consistent rotation schedule every 5,000 to 7,500 miles. These disciplined practices guarantee your tires perform safely and extend their service life.
Frequently Asked Questions
Can I Do a Tire Rotation Myself?
You can rotate tires yourself by using the proper tools required, like a jack and wrench. Follow tire maintenance tips carefully to avoid common mistakes, ensuring correct torque and rotation patterns for safe, effective tire care.
How to Rotate Tires for Dummies?
You’ll combat tire wear by following maintenance tips: loosen lug nuts, lift car safely, swap tires per drive type, retighten lug nuts with torque wrench. Always use safety precautions like jack stands and flat surfaces to liberate yourself confidently.
What Is the Best Pattern to Rotate Tires?
Don’t let uneven tire wear enslave you! For front-wheel drive, move fronts straight back, cross rear tires forward. For all wheel drive, include the spare in a five-tire rotation. Maintain rotation frequency for freedom.
How to Jack up a Car to Rotate Tires?
You’ll prioritize jack safety by parking on flat ground and using a 2-3 ton floor jack. Lift at the frame or differential with proper lifting techniques, secure jack stands, and guarantee tire alignment is maintained before rotating.
Final Thoughts
Now that you’ve expertly juggled lug nuts and mastered tire tango, your car’s ready to roll smoother than a freshly buttered biscuit. Remember, skipping these steps only guarantees uneven wear, poor handling, and a surprise trip to the mechanic—fun, right? So, grab that wrench, follow the rotation patterns like a pro, and keep your ride safe and efficient. Because nothing says “I’ve got this” like perfectly rotated tires and a tightened set of lug nuts.
 Why Do Your Tires Show Signs of Needing Care?
Reliable Floor Jacks on a Budget: Best Picks for Under $150
Top-Rated Floor Jacks Over $100: Built for Professionals, Priced for Smart Buyers
If you want to know other articles similar to How to Rotate Your Car Tires Yourself you can visit the Tire Care and Rotation category.
How Often to Rotate Tires on All-Wheel Drive

Why Do Your Tires Show Signs of Needing Care?

What Tire Maintenance Checklist Should New Owners Follow?

7 Tips to Save on Local Tire Rotation Costs

Essential Tire Maintenance Tips for Winter Driving
Leave a Reply
This is also interesting